
1 Quart of whole milk
1/4 of store bought plain yogurt that is at room temperature (Make sure it has active cultures.( I like simple truth whole milk greek). Once you make this first batch, you will set aside some in the fridge for the next batch. SAVINGS!
Things to know before you start:
Don't use a wooden spoon. Use a metal spoon. Don't ask me why. I was told this tip and it made all the difference.
Seed yogurt- is the yogurt you set aside for the next batch. If you aren't going to be making yogurt inside a week, then you will need to feed your seed yogurt. You will warm some milk and stir it in to give the culture some food. I just find it easier to make another batch of yogurt. If I have to warm milk anyway.
Heat your milk up to 180 degrees. I will heat my milk in a quart mason jar sitting in a pan of water. At the same time, be preheating your oven to 180 degrees. Heating the milk alters the makeup of the milk to make it more receptive to the culture. Once it gets to 180, remove the milk from the stove and place it, in the pan, into the oven at 180 degrees for 30 minutes. After 30 minutes, TURN OFF YOUR OVEN, and remove the pan from the oven. Take out the jar and sit it in on the counter to allow it to cool to 110. When it has cooled to 110, add some of the now cooled milk to your culture. Just a couple of TBS and mix it well. You just want to thin it some. Then add the thinned culture to the rest of the milk. If you have a yogurt maker, Kudos. Set it up and off you go. A yogurt maker is not necessary. I used to take a Playmate cooler (Any cooler will work, but keep it small), fill up a couple of pint jars with very hot water and put them and the yogurt in. Then I would put hand towels all round. I once saw a lady who very shrewdly inserted a light bulb into the lid of a Styrofoam cooler and used that as a heat source. I don't use a cooler now. I just put my yogurt in the oven with only the oven light on. The oven should have cooled to less than 110° by the time you put your jar in. If it still feels too hot, wait just a few minutes with the door open, and let it cool a little further. Just make sure the yogurt is sitting more towards the door of the oven and not right up against the light. That light can get warm. I will sometimes place a towel on the rack since it may still be too warm from the previous 180 degree temp. That's what I sit my containers on. The idea is to incubate your yogurt keeping the temp above 80 degrees but not so hot that it kills the bacteria. Place the jar into the oven and leave it for about 4-8 hours. You will know it's set up when it doesn't move much in the jar and you see a little bit of clear liquid moving around. You can also gently press down on the top of the yogurt with the back of a spoon. If it leaves an impression, then it's done. It will set up even more as it chills. You can let it sit for up to 8, even 12 hours, but the longer it sits the more tangy it will be. Mistakes in yogurt making are still great for a substitute for buttermilk. So give it a try. It's something that is not very labor intensive. My cost analysis for this initial batch, culture included, is 32 oz. for 1.49 and that is because I used a Greek yogurt culture and they are more expensive. Now that I have made my yogurt and therefore my culture for the next time, my cost for 32 oz. of yogurt will be .68. Compare that to the cost of a 32 oz. container of yogurt on sale at the store. The cheapest I have seen is a sale price of $3.99. Even buying the more expensive yogurt for a culture still put me cheaper than store bought.
NO WHEY! GREEK YOGURT!
Big FYI here. You can make your own Greek yogurt by simply straining your homemade yogurt. The whey that is drained off is a great source of protein and it also aids digestion. You can add it to biscuits, corn bread, quick breads muffins, soups etc. In fact I will use whey to replace milk called for in baking items where yeast isn't called for; a 1:1 ratio. The only change I make is to add a little baking soda. If you're making oatmeal, put your oats in the bowl the night before with 2 TBS of Whey and the water to cook them with let it soak overnight then cook it up the next morning. You can also use it to soak dried beans, rice, and other grains. A good resource for using the whey is the book " Nourishing Traditions" by Sally Fallon.
YOGURT CHEESE!
Take cheese cloth, Muslin, or even a clean pillow case; Put your yogurt in the cheese cloth and hang it up over a bowl ( of course) to catch the whey. Once you think all the liquid has drained off, Place the yogurt, in the cloth you have it in, into a stainer and add a little weight to it to push out more whey. After that, take another piece of clean cloth (you can sacrifice that pillow case to get multiple pieces. Worth it!), and line a small ( bout 1 cup size) refrigerator dish. Take your yogurt out of the previous cloth, and place in the dish on top of the cloth you just put in there. Wrap the fabric around the yogurt. A little extra fabric is fine. You can just pack the extra in It will help remove any other moisture. Let it sit in your fridge a day or so. Remove the yogurt from the fabric, and you will have yogurt cheese. Use it like cream cheese. You can add fresh herbs to it and have some awesome spread. I will work a little salt into mine, but you don't have to if you don't want to. It's fine as is.
So what are you waiting for! Go for it!
Mint Extract
What you will need:
Vodka (80 proof. Not for drinking now!)
Mint leaves
glass jars( I used wide mouth pint jar
First off you want to take your mint leaves off the branches and wash them well under cool water. Let them dry completely before you start.
 While you are waiting on your leaves to dry, go ahead and take your jars and have them in boiling water for 20 minutes. I also boiled my lids and rings so everything was sterile. It is important to keep the work area clean.
 Once your leaves are dry, chop them coarsely. This give a lot of area for the vodka to work on extracting the oils. Once your jars are done, fill them about half full of the chopped mint.
 Then you want to take the vodka and pour it over the leaves. Leave about 1 inch head space.
 Then top with your lid and store in a dark area for a week. I dated mine so I could make sure I left it long enough.
 I ended up with 20 oz of mint extract. That is worth about 10 bottles of extract at the store. Walmart sells the mint extract for 2.98 for 2 oz. This cost me the cost of prep and the vodka. So about $8. Which compares to Walmart=.80 for 2 oz. Nice. I have plenty more mint where that came from. I am thinking I will add more mint to my extract and let it steep another week just to strengthen it a little, but all in all I would say this is a good investment, and so easy to do.
How to make Chicken broth (or any type broth, just change the bones)
Once dinner was over, and the turkey had cooled, I de-boned it, while placing all the bones in my crock pot. I ended up with a huge breast in my fridge to use for sandwiches. Plus all this other meat!


Heat your milk up to 180 degrees. I will heat my milk in a quart mason jar sitting in a pan of water. At the same time, be preheating your oven to 180 degrees. Heating the milk alters the makeup of the milk to make it more receptive to the culture. Once it gets to 180, remove the milk from the stove and place it, in the pan, into the oven at 180 degrees for 30 minutes. After 30 minutes, TURN OFF YOUR OVEN, and remove the pan from the oven. Take out the jar and sit it in on the counter to allow it to cool to 110. When it has cooled to 110, add some of the now cooled milk to your culture. Just a couple of TBS and mix it well. You just want to thin it some. Then add the thinned culture to the rest of the milk. If you have a yogurt maker, Kudos. Set it up and off you go. A yogurt maker is not necessary. I used to take a Playmate cooler (Any cooler will work, but keep it small), fill up a couple of pint jars with very hot water and put them and the yogurt in. Then I would put hand towels all round. I once saw a lady who very shrewdly inserted a light bulb into the lid of a Styrofoam cooler and used that as a heat source. I don't use a cooler now. I just put my yogurt in the oven with only the oven light on. The oven should have cooled to less than 110° by the time you put your jar in. If it still feels too hot, wait just a few minutes with the door open, and let it cool a little further. Just make sure the yogurt is sitting more towards the door of the oven and not right up against the light. That light can get warm. I will sometimes place a towel on the rack since it may still be too warm from the previous 180 degree temp. That's what I sit my containers on. The idea is to incubate your yogurt keeping the temp above 80 degrees but not so hot that it kills the bacteria. Place the jar into the oven and leave it for about 4-8 hours. You will know it's set up when it doesn't move much in the jar and you see a little bit of clear liquid moving around. You can also gently press down on the top of the yogurt with the back of a spoon. If it leaves an impression, then it's done. It will set up even more as it chills. You can let it sit for up to 8, even 12 hours, but the longer it sits the more tangy it will be. Mistakes in yogurt making are still great for a substitute for buttermilk. So give it a try. It's something that is not very labor intensive. My cost analysis for this initial batch, culture included, is 32 oz. for 1.49 and that is because I used a Greek yogurt culture and they are more expensive. Now that I have made my yogurt and therefore my culture for the next time, my cost for 32 oz. of yogurt will be .68. Compare that to the cost of a 32 oz. container of yogurt on sale at the store. The cheapest I have seen is a sale price of $3.99. Even buying the more expensive yogurt for a culture still put me cheaper than store bought.
NO WHEY! GREEK YOGURT!
Big FYI here. You can make your own Greek yogurt by simply straining your homemade yogurt. The whey that is drained off is a great source of protein and it also aids digestion. You can add it to biscuits, corn bread, quick breads muffins, soups etc. In fact I will use whey to replace milk called for in baking items where yeast isn't called for; a 1:1 ratio. The only change I make is to add a little baking soda. If you're making oatmeal, put your oats in the bowl the night before with 2 TBS of Whey and the water to cook them with let it soak overnight then cook it up the next morning. You can also use it to soak dried beans, rice, and other grains. A good resource for using the whey is the book " Nourishing Traditions" by Sally Fallon.
YOGURT CHEESE!
Take cheese cloth, Muslin, or even a clean pillow case; Put your yogurt in the cheese cloth and hang it up over a bowl ( of course) to catch the whey. Once you think all the liquid has drained off, Place the yogurt, in the cloth you have it in, into a stainer and add a little weight to it to push out more whey. After that, take another piece of clean cloth (you can sacrifice that pillow case to get multiple pieces. Worth it!), and line a small ( bout 1 cup size) refrigerator dish. Take your yogurt out of the previous cloth, and place in the dish on top of the cloth you just put in there. Wrap the fabric around the yogurt. A little extra fabric is fine. You can just pack the extra in It will help remove any other moisture. Let it sit in your fridge a day or so. Remove the yogurt from the fabric, and you will have yogurt cheese. Use it like cream cheese. You can add fresh herbs to it and have some awesome spread. I will work a little salt into mine, but you don't have to if you don't want to. It's fine as is.
So what are you waiting for! Go for it!
Wheat bread(1/2 white 1/2 wheat flour)
2 cups slightly warm water(about 105-110 degrees)
1 TBS yeast
1/3 cup brown sugar
1/3 cup olive oil(or oil of your choice)
2 tsp salt
5-6 cups of flour(1/2 and 1/2 or whatever you want)
 First of all you take your 2 cups of slightly warm water and your brown sugar and mix them together well. It should look like the above pic. Then sprinkle the yeast over the top of the water/sugar mixture. The yeast will begin to foam a little like the pic below.
 Once the yeast foams well you can add your oil and salt. Notice I added the oil first then I put the salt inside the blob of oil. I personally like to keep the salt separate from the yeast until I begin to mix everything.
 Now add 2 cups of whole wheat flour or all purpose if you are making all white bread. Mix it well with a whisk if you have it or a good spoon. Then add another cup of all purpose flour and stir it in with a spoon. If you were using a whisk, you need to switch totally to a spoon now or you end up with dough stuck in the whisk everywhere.
 Add another cup of all purpose flour. You should be up to 4 cups of flour in the bowl. Your dough should start to look like the pic below.
 Fill up your measuring cup again with another cup of flour. Stir in as much as you can with a spoon and then dump it out onto the counter. Now you are going to only use enough flour to keep the dough from sticking to your hands as you knead the dough. Just sprinkle some on top.
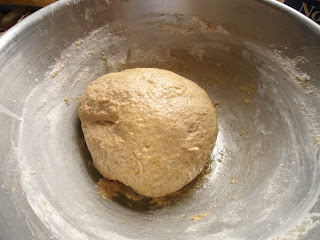
 You will knead the dough by pushing the dough forward with the palms of your hands. Turn it a little, fold it back towards you and push forward again. If the dough gets sticky(and it will) add a little more flour. You do not want to add too much flour. I will set my kitchen timer for 6-8 minutes and knead no more than that. Kneading activates the gluten in the bread. You will be able to test the dough by poking it with a floured finger. If it bounces back well it is good to go.
 Place your dough into a greased bowl. I use the bowl I mixed the dough in cause I hate to wash a lot of dishes. Lol. Turn it a bit to get a coating of oil/grease then cover it. I use a plate to cover mine cause I don't want to use plastic wrap that I have to throw away. Waste not! Let the dough rise only about 25-30 min. No more or your bread will be dry and crumbly.
 When your dough is finished with its first rising, take it out, punch it down and knead it a bit more til it starts to feel "tight" again. You know like it will tear again. Cut the dough in half. I usually cut mine unevenly cause I have a smaller loaf pan and a larger loaf pan. So your eyes are not deceiving you. Shape into loaves. They don't have to be perfect. Just tuck the ends underneath until it looks loaf like.
 Cover your loaves and let them rise in a warm place until about 1 inch over the top of the pan. Again I used a wet cloth napkin to avoid plastic wrap.
 The pic below show what the risen dough should look like in the pan. Before you bake them. I put my loaves into a cool oven while the oven preheats to help the loaves rise a little more. bake in a 350 oven for about 25 min.
 When the bread comes out of the oven and while it is still hot, take a stick of butter and rub it over the top of the loaves.
 Then cover the loaves with a clean napkin or towel while they cool. Really don't want plastic here. Let them cool about 10 min then remove them from their loaf pans and let them cool on a wire rack until completely cool. Then put into a gallon size storage bag or other storage container.

2 cups slightly warm water(about 105-110 degrees)
1 TBS yeast
1/3 cup brown sugar
1/3 cup olive oil(or oil of your choice)
2 tsp salt
5-6 cups of flour(1/2 and 1/2 or whatever you want)


Mint Extract
What you will need:
Vodka (80 proof. Not for drinking now!)
Mint leaves
glass jars( I used wide mouth pint jar
First off you want to take your mint leaves off the branches and wash them well under cool water. Let them dry completely before you start.


How to make Chicken broth (or any type broth, just change the bones)
Once dinner was over, and the turkey had cooled, I de-boned it, while placing all the bones in my crock pot. I ended up with a huge breast in my fridge to use for sandwiches. Plus all this other meat!

Having all the bones, giblets, etc back in the crock pot, I proceeded to add some celery (2 large stalks), some carrots,half a large onion, couple of tsp salt, and 2 tbs vinegar. I then covered the whole shebang with water, put the lid on and set it to low.

It cooked for over a day, maybe 30 hours? Then I turned it off to cool. Once cool, I strained off all the broth that had been made and placed it in the fridge for the fat to solidify on top. The scraps were tossed to the chickens! This morning, out came the broth. I scraped off the fat at the top and put the fat in a jar to make, in the future, dog treats for the fur babies. I brought the broth to a boil and then proceeded to can 4 quarts of bone broth. Liquid gold! This is the stuff that make's homemade chicken noodle soup cure what ails ya.

So from a 23 pound turkey, I was able to use just about all of it. That's the best part of stretching what you have. Make sure you get the most bang for your buck!
congrats on the weight loss, nust be hard with all your yummy food!
ReplyDeleteMy weight loss was great while it lasted, but I got derailed. I'm getting back to it before things get to bad. I will say this; If I want something bad enough; I have it. I just count it. That way nothing is off limits. Today I had 1 homemade oatmeal raisin cookie. I measured it, and counted it, then enjoyed it with a cup of coffee.
ReplyDelete